A backdoor attack in WordPress involves injecting hidden malicious code into the site, enabling attackers to gain unauthorized access and control. This allows them to bypass standard security measures and maintain control even after the primary vulnerability is fixed.

NativePHP Blog

Introduction
PHP developers have long honed their skills on the web, using their coding expertise to create dynamic websites and powerful web applications. Imagine if they could extend this knowledge to develop comprehensive desktop software as well. This is where NativePHP emerges as a revolutionary toolkit. It empowers seasoned PHP developers to bridge the gap and conquer the desktop realm. Forget about simply wrapping a web interface around a desktop
application. NativePHP provides a comprehensive solution, allowing you to utilize your existing PHP knowledge to create native desktop applications
that run seamlessly on Windows, Mac, and Linux. Here’s a deeper dive into the advantages that make NativePHP so compelling for PHP developers:
- Leveraging Existing Skills: No need to embark on a crash course in a new programming language. NativePHP embraces the familiar syntax of PHP, ensuring a smooth transition for web developers. This minimizes the learning curve and allows you to focus on crafting powerful desktop applications.
- Cross-Platform Domination: Reach a wider audience with a single codebase. NativePHP integrates seamlessly with frameworks like Electron and Tauri, ensuring a consistent user experience across all major operating systems. This eliminates the need for platform-specific development efforts, saving time and resources.
- Streamlined Development: NativePHP simplifies the development process with built-in features that enhance functionality. These include desktop notifications for user engagement, effortless database integration for data management, and the ability to directly interact with the host operating system, allowing your application to leverage system resources effectively.
Whether you’re a seasoned Laravel developer or a veteran PHP professional, NativePHP unlocks a new frontier for building feature-rich desktop applications. Stay tuned for future posts where we’ll delve deeper into NativePHP’s functionalities, guide you through building your first desktop app, and explore the exciting possibilities it unlocks for the PHP development community.
NativePHP is a powerful blend of components designed to bring PHP developers into the desktop application arena. Here’s what it comprises:
- User-Friendly Classes: NativePHP provides a suite of intuitive classes and abstractions that allow seamless interaction with various host operating system features.
- Build and Bundle Tools: It includes tools for constructing and packaging your native applications using popular browser environments like Electron or Tauri.
- Static PHP Runtime: With a built-in static PHP runtime, NativePHP ensures your applications can run smoothly on any user’s system without requiring additional setup or effort from the user.
What's Included?
-
- Window Management: Tools for creating and controlling application windows.
- Menu Management: Functions to build and customize application menus.
- File Management: Utilities for handling files within your application.
- Database Support: Integrated support for SQLite, allowing easy database interactions.
- Native Notifications: Capability to send native system notifications to users.
What NativePHP Isn't
As I explore NativePHP for my blog, it’s important to clarify what it isn’t:
- Not Opinionated: Although currently supporting only a Laravel driver, NativePHP aims to expand to work with any PHP framework or no framework at all in the future. This flexibility allows developers to choose tools that best fit their needs and preferences.
- Not a GUI Framework: Unlike some platforms, NativePHP doesn’t impose specific guidelines on how to design your app’s user interface. Whether you prefer React, Vue, Livewire, Inertia, or traditional HTML/CSS, NativePHP supports a wide range of UI toolsets for your projects.
- Not a New Fork of PHP: NativePHP utilizes the familiar and robust PHP language, ensuring compatibility and ease of use for developers already versed in PHP development.
These distinctions highlight NativePHP’s adaptability and integration capabilities within existing development workflows.
Important Note
NativePHP is still in its alpha phase. While it’s an exciting toolkit to experiment with, we recommend holding off on using it for production releases of your applications until it reaches a more stable version.
Here is an example showing How to Build a Desktop Application with NativePHP and Laravel.
Building a Desktop Application with NativePHP and Laravel
Introduction
NativePHP is an exciting framework designed to extend Laravel applications into the realm of desktop development. In this tutorial, we’ll walk through the steps to create a sample desktop application using NativePHP alongside Laravel.
Prerequisites
Before we begin, ensure you have the following prerequisites set up:
- Laravel installed (preferably a new or existing project)
- Composer globally installed
- Node.js and npm installed for frontend dependencies
Getting Started with NativePHP
1. Understanding NativePHP
NativePHP is currently in its alpha version and is tailored to seamlessly integrate with Laravel applications, leveraging its ecosystem and features.
2. Installation
To start using NativePHP, follow these steps:
- Install the NativePHP runtime using Composer:
composer require nativephp/electron - Run the NativePHP installer:
php artisan native:install
3. Development Setup
After installation, you can begin development:
- Start the development server:
php artisan native:serve - For hot reloading during development, use:
npm run dev
4. Routing Configuration (web.php)
Here’s a sample configuration for your routes in web.php:
<?php
use App\Models\User;
use Illuminate\Http\Request;
use Illuminate\Support\Facades\Http;
use Illuminate\Support\Facades\Route;
use Native\Laravel\Facades\Notification;
use Native\Laravel\Facades\Settings;
use Native\Laravel\Facades\Window;
Route::get(‘/’, function () {
if (request()->openwindow) {
Window::open(‘about’)
->route(‘about’)
->width(800)
->height(800)
->showDevTools(false);
}
if (request()->notification) {
Notification::new()
->title(‘Hello from NativeApp’)
->message(‘This is a detail message coming from your native app.’)
->show();
}
return view(‘welcome’, [
‘users’ => User::all(),
]);
});
Route::post(‘/user’, function () {
User::factory()->create();
Notification::new()
->title(‘User created!’)
->message(‘Details about user here.’)
->show();
return back();
});
Route::view(‘/about’, ‘about’)->name(‘about’);
Route::get(‘/settings’, function () {
return view(‘/settings’);
});
Route::post(‘/settings’, function (Request $request) {
Settings::set(‘theme’, $request->theme);
return redirect(‘/’);
});
5. Service Provider Configuration (NativeAppServiceProvider.php)
<?php
namespace App\Providers;
use App\Events\MyEvent;
use Native\Laravel\Facades\MenuBar;
use Native\Laravel\Facades\Window;
use Native\Laravel\Menu\Menu;
class NativeAppServiceProvider
{
/**
* Executed once the native application has been booted.
* Use this method to open windows, register global shortcuts, etc.
*/
public function boot(): void
{
MenuBar::create()
// ->route(‘/about’)
->width(300)
->height(300)
->showDockIcon();
Menu::new()
->appMenu()
->editMenu()
->viewMenu()
->windowMenu()
->submenu(‘About’, Menu::new()
->link(‘https://beyondco.de’, ‘Beyond Code’)
->separator()
->label(‘My Label’)
->event(MyEvent::class, ‘Trigger my event’, ‘CmdOrCtrl+Shift+D’)
)->register();
Window::open()
->width(400)
->height(400)
->showDevTools(false)
->rememberState();
}
}
Add custom service provider in config/app.php.
6. Custom Service Provider
Create a custom service provider for view management:
php artisan make:service ViewServiceProvider.php
<?php
namespace App\Providers;
use Illuminate\Support\ServiceProvider;
use Illuminate\View\View;
use Native\Laravel\Facades\Settings;
class ViewServiceProvider extends ServiceProvider
{
/**
* Register services.
*/
public function register(): void
{
//
}
/**
* Bootstrap services.
*/
public function boot(): void
{
view()->composer(‘*’, function (View $view) {
$view->with(‘theme’, Settings::get(‘theme’, ‘light’));
});
}
}
7. Blade Layouts and Views
Prepare necessary Blade layouts and views:
- resources/views/components/layout.blade.php <!DOCTYPE html>
<html lang=”en”>
<head>
<meta charset=”UTF-8″>
<meta name=”viewport” content=”width=device-width, initial-scale=1.0″>
<title>NativePHP</title>
@vite(‘resources/js/app.js’)
<style>
body.dark {
background: #222;
color: white;
}
body.dark a {
color: lightblue;
}
</style>
</head>
<body class=”{{ $theme }}”>
<div>
<a href=”/”>Home</a>
<a href=”/about”>About</a>
<a href=”/?openwindow=true”>Open Window</a>
<a href=”/?notification=true”>Notification</a>
<a href=”/settings”>Settings</a>
</div>
<main>
{{ $slot }}
</main>
</body>
</html> - resources/views/about.blade.php
<x-layout>
<div>
About Page
</div>
</x-layout> - resources/views/settings.blade.php <x-layout>
<div>
<form action=”/settings” method=”POST”>
@csrf
<fieldset>
<legend>Select your theme</legend>
<div>
<input type=”radio” id=”light” name=”theme” value=”light” @checked($theme === ‘light’)>
<label for=”light”>Light</label>
</div>
<div>
<input type=”radio” id=”dark” name=”theme” value=”dark” @checked($theme === ‘dark’)>
<label for=”dark”>Dark</label>
</div>
</fieldset>
<button type=”submit”>Save</button>
</form>
</div>
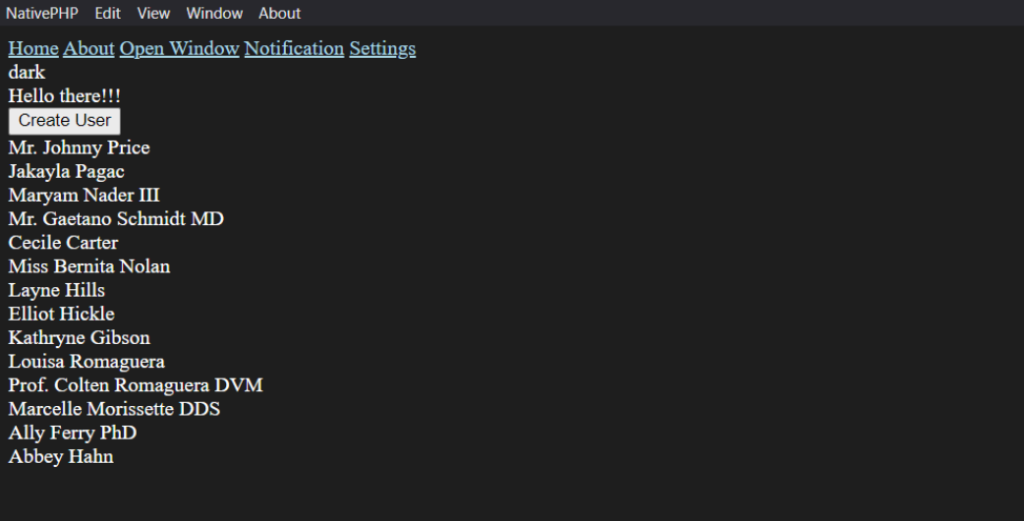
</x-layout> - resources/views/welcome.blade.php <x-layout>
<div>
{{ ‘{‘ }} $theme }}
</div>
<div>
Hello there!!!
</div>
<div>
<div>
<form action=”/user” method=”POST”>
@csrf
<button type=”submit”>Create User</button>
</form>
</div>
<div>
@forelse ($users as $user)
<div>{{ ‘{‘ }} $user->name }}</div>
@empty
<div>No users found</div>
@endforelse
</div>
</div>
</x-layout> - Configure migrations and SQLite setup if necessary
php artisan migrate - And run these commands to run the application
composer update
npm run dev
php artisan native:serve
Conclusion
Congratulations! You’ve successfully set up a basic NativePHP desktop application integrated with Laravel. This tutorial covered the installation process, routing setup, service provider configuration, and view management. Feel free to explore NativePHP further and adapt it to more complex desktop application needs.
Trust and Worth
Our Customers
We are having a diversified portfolio and serving customers in the domains namely Sports Management, Online Laundry System, Matrimonial, US Mortgage, EdTech and so on.


Would you like to start a project with us?
DAStek team would be happy to hear from you and would love to turn your ‘Imaginations to Reality’.